This post has a quick and easy to understand explanation of how solar cells work.
I've also written a slightly more technical explanation, which is still very accessible! The second explanation really offers some more context to understand the new developments in solar technology, and hopefully allows a greater appreciation for them.
Solar cells use two different types of silicon sandwiched next to each other. One is the more negative side, which has extra electrons in it. The other is the more positive side, which has holes for the electrons in it.
The two pieces are connected together with a wire.
When light hits the solar cell, electrons are released from the negative side and they can move through the wire to fill the holes in the positive side.
That wire now has electricity moving through it that we can use!
Solar cells can be made to work best with different wavelengths of light. Some are tuned for natural sunlight, others for artificial etc. The wavelength of light that the solar cells work best with is the band gap.
Now the more technical explanation...
Currently most solar cells use silicon, which has four outer electrons.
In Figure 1 you can see the structure of pure, N-type and P-type silicon.
In pure silicon, each atom is sharing its four electrons with the surrounding silicon atoms.
The silicon is then doped i.e. it has impurities added to it.
Silicon can have phosphorus atoms added, and these introduce an extra electron as phosphorous has five outer electrons - this is the negative side, N-type.
Or silicon can have boron added, and this creates a hole, as boron has only three outer electrons - this is the positive side, P-type.
The P-type and N-type silicons are then sandwiched together. At this point, the free electrons in the N-type silicon jump over to the P-type silicon, resulting in negative ions. And the holes in the P-type silicon jump over to the N-type, resulting in positive ions.
This creates an area called the depleted region in the middle (see Figure 2 - the diagram helps a lot for this bit!). One side (the P-type silicon) of the depleted region is negative, as there is now an excess of negative ions. The other side (the N-type silicon) is positive, as there is an excess of positive ions. This creates an electric field.
If a photon of light hits the solar cell, an outer electron will be lost and a hole created - this is called an electron-hole pair. If this happens in the electric field, that electron is attracted to the positive side of the depleted region, and so ends up in the N-type silicon. The resultant hole moves to the negative side of the depleted region, and so ends up in the P-type silicon.
If you connect both sides with a wire, the electrons can now flow from the N-type silicon, through the wire and over to the P-type silicon. You now have electricity flowing through that wire!
Not every photon will result in an electron-hole pair being created. The photon must have sufficient energy - that energy is known as the 'band gap' (see Figure 3). Some solar cells can lose electrons very easily (low band gap), others require more energy (high band gap). But any excess energy that the photon has is lost as heat. So if the solar cell has a very low band gap, you can expect more heat to be created. If it has a high band gap, there won't be as many electron-hole pairs created, but less heat.
These band gaps are important, and some of the developments in solar cells is trying to make use of more than just a single band gap.
I've also written a slightly more technical explanation, which is still very accessible! The second explanation really offers some more context to understand the new developments in solar technology, and hopefully allows a greater appreciation for them.
Solar cells use two different types of silicon sandwiched next to each other. One is the more negative side, which has extra electrons in it. The other is the more positive side, which has holes for the electrons in it.
The two pieces are connected together with a wire.
When light hits the solar cell, electrons are released from the negative side and they can move through the wire to fill the holes in the positive side.
That wire now has electricity moving through it that we can use!
Solar cells can be made to work best with different wavelengths of light. Some are tuned for natural sunlight, others for artificial etc. The wavelength of light that the solar cells work best with is the band gap.
Now the more technical explanation...
Currently most solar cells use silicon, which has four outer electrons.
In Figure 1 you can see the structure of pure, N-type and P-type silicon.
In pure silicon, each atom is sharing its four electrons with the surrounding silicon atoms.
The silicon is then doped i.e. it has impurities added to it.
Silicon can have phosphorus atoms added, and these introduce an extra electron as phosphorous has five outer electrons - this is the negative side, N-type.
Or silicon can have boron added, and this creates a hole, as boron has only three outer electrons - this is the positive side, P-type.
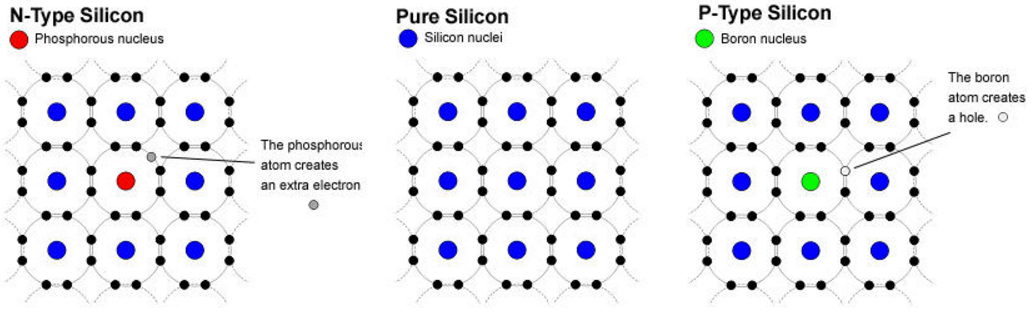 |
| Fig. 1 Pure and doped silicon |
The P-type and N-type silicons are then sandwiched together. At this point, the free electrons in the N-type silicon jump over to the P-type silicon, resulting in negative ions. And the holes in the P-type silicon jump over to the N-type, resulting in positive ions.
This creates an area called the depleted region in the middle (see Figure 2 - the diagram helps a lot for this bit!). One side (the P-type silicon) of the depleted region is negative, as there is now an excess of negative ions. The other side (the N-type silicon) is positive, as there is an excess of positive ions. This creates an electric field.
 |
| Fig. 2 Solar cell showing the P-type and N-type layers, and the depleted region |
If a photon of light hits the solar cell, an outer electron will be lost and a hole created - this is called an electron-hole pair. If this happens in the electric field, that electron is attracted to the positive side of the depleted region, and so ends up in the N-type silicon. The resultant hole moves to the negative side of the depleted region, and so ends up in the P-type silicon.
If you connect both sides with a wire, the electrons can now flow from the N-type silicon, through the wire and over to the P-type silicon. You now have electricity flowing through that wire!
Not every photon will result in an electron-hole pair being created. The photon must have sufficient energy - that energy is known as the 'band gap' (see Figure 3). Some solar cells can lose electrons very easily (low band gap), others require more energy (high band gap). But any excess energy that the photon has is lost as heat. So if the solar cell has a very low band gap, you can expect more heat to be created. If it has a high band gap, there won't be as many electron-hole pairs created, but less heat.
 |
| Fig. 3 Band gaps and efficiencies of different solar cells |
These band gaps are important, and some of the developments in solar cells is trying to make use of more than just a single band gap.
No comments:
Post a Comment